🥈 酷库 - react

作为前端,还是什么都知道一些的好,国人还是用 Vue 生态较多。
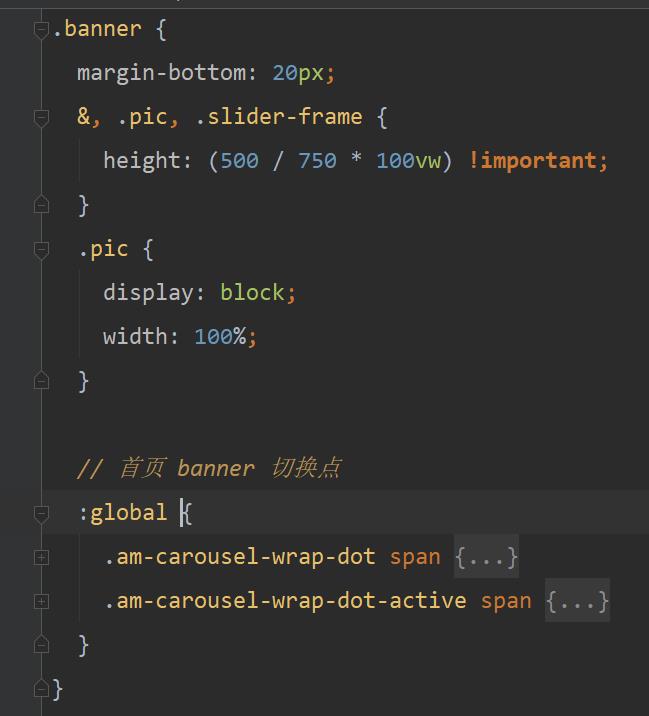
优雅的 css module
react 不像 vue 有 scoped
create-react-app 默认集成了 css-module
个人感觉也是比较好使的一种方式
- 命名需要已 .module 的方式结尾并在组件中引入 styles 对象

———————– 手动间隙 ———————–
- 在 jsx 中定义 className

———————– 手动间隙 ———————–
- 在 css 文件中定义样式,要覆盖其他组件的样式则用 :global
———————– 手动间隙 ———————–
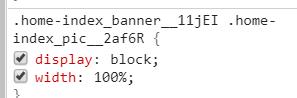
- 覆盖其他组件的样式生成后

———————– 手动间隙 ———————–
- 后代选择器类名生成后
———————– 手动间隙 ———————–
- 传入组件的 props 中涉及类名的,也需要使用 styles 对象的方式

———————– 手动间隙 ———————–
注意
建议采用后代选择器的方式定义类名,而非短横线
jsx 中会方便很多(对象写法以及 ide 代码提示)
<div className={ styles.banner }>
  {/** 不方便 **/}
  <div className={ styles['banner-pic'] }></div>

  {/** 方便 **/}
  <div className={ styles.pic }></div>
</div>
———————– END ———————–
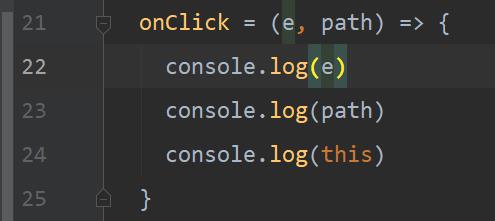
事件传参以及 this 指向
- render 中写成函数封函数的方式,传递 event 对象和其他参数

- 如果事件处理函数中需要 this,需要写成下面这种形式,否则 this 指向错误(public class fields 语法)
———————– END ———————–
react-router 到底引入哪一个
只引入 react-router-dom 即可
- react-router(实现路由的核心)
- react-router-dom(在 react-router 的基础上多了一些组件)
———————– END ———————–
react-router 传参
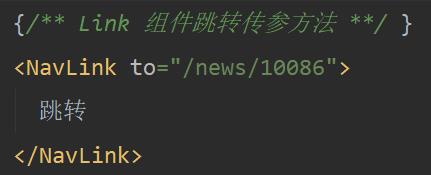
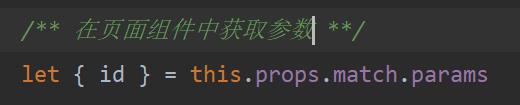
- 显式 - path 传参
用处:参数数量少的情况下
优点:刷新页面参数仍然存在,可清楚表达语义
缺点:path 参数位置固定,参数过多可能导致灵活问题
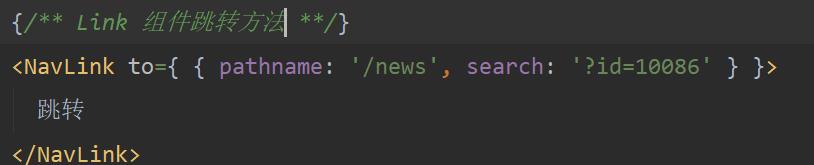
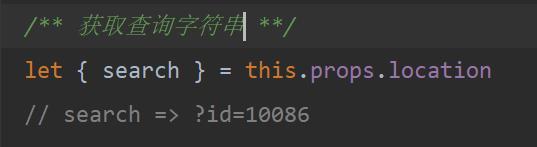
- 显式 - 查询字符串传参
用处:参数数量多的情况下
优点:刷新页面参数仍然存在
缺点:不如 path 传参语义性强
- 隐式 - state 传参
用处:参数保密 / 参数数量多的情况
优点:对象传参,写起来简单,保证参数安全性
缺点:页面刷新后参数失效


———————– END ———————–
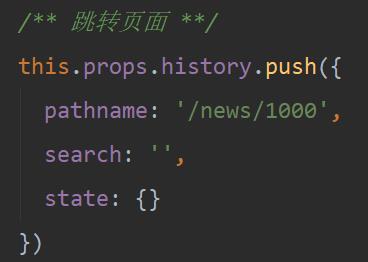
react-router js 跳转
组件中
在页面级组件上,默认已有 props.history
在非页面级组件中,使用 withRouter 封装后会给 props 设置 history 属性


———————– 手动间隔 ———————–
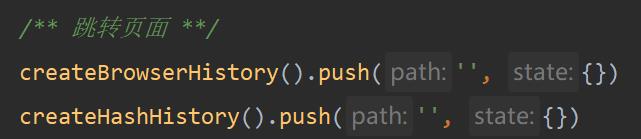
非组件中
在其他 js 中,可以使用 history 库来实现
react-router 有依赖不用自己安装,直接引入即可

———————– END ———————–
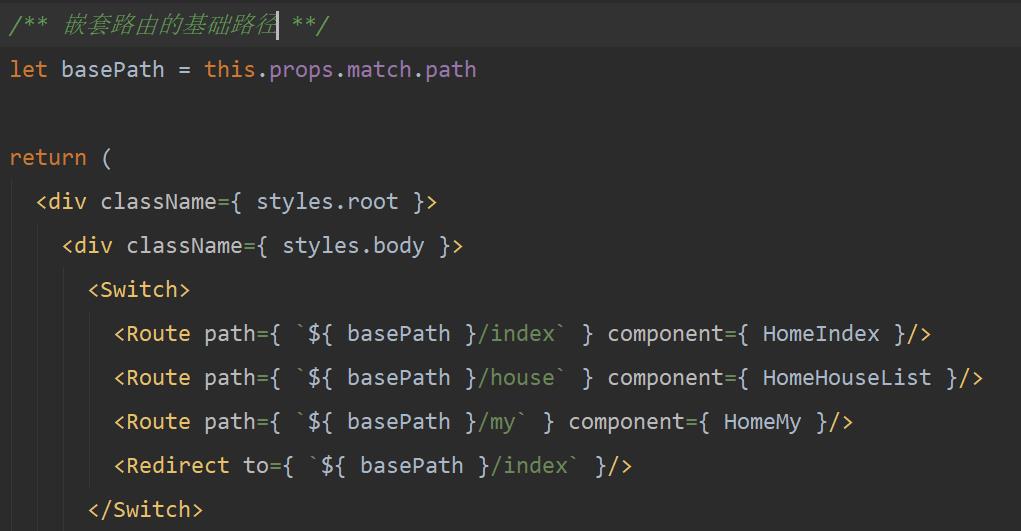
react-router 路由嵌套
- 主路由
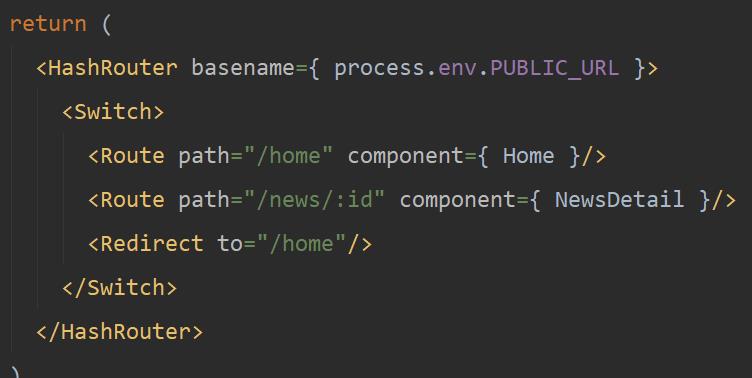
- 子路由
react-redux 使用步骤
我个人不太喜欢在用常量表示 type
需要多一层定义引用…着实麻烦
个人喜欢通过 mapStateToProps 和 mapDispatchToProps 引入全部的 state 和 actions
这样的缺点是会混淆组件内部的状态和方法来源,但是可以通过加前缀的形式区分
比如: state: { storeValue }, actions: { setStoreValue }
- 引入
npm i --save redux
npm i --save react-redux
———————– 手动间隔 ———————–
- 创建 /store/reducer.js 文件
```javascript
const defaultState = {
storeValue: null
}
export default function (state = defaultState, action) {
switch (action.type) {
case ‘storeValue’: {
return { …state, value: action.value }
}
default: {
return state
}
}
}
----------------------- 手动间隔 -----------------------

3. 创建 /store/actions.js 文件
```javascript
export const setStoreValue = function (value) {
  return {
    type: 'storeValue',
    value
  }
}
———————– 手动间隔 ———————–
- 创建 /store/index.js 文件
```jsx harmony
import { createStore } from ‘redux’
import reducer from ‘./reducer’
import * as actions from ‘./actions’
let store = createStore(reducer)
/** 默认引用全部的 state 和 actions **/
let mapStateToProps = function (state) {
return {
…state
}
}
let mapDispatchToProps = function (dispatch) {
return actions
}
export default store
export {
store,
mapStateToProps,
mapDispatchToProps
}
----------------------- 手动间隔 -----------------------

5. 将 Provider 包裹在 App 组件的外侧,同时传入 /store/index.js 暴露的 store 作为 prop
```jsx harmony
import React from 'react'
import ReactDOM from 'react-dom'

import { Provider } from 'react-redux'
import store from './store'

import App from './App'

ReactDOM.render(
  <Provider store={ store }>
    <App/>
  </Provider>,
  document.getElementById('root')
)
———————– 手动间隔 ———————–
- 在组件中使用 connect 方法连接 redux(通过 props 的方式传入组件)
```jsx harmonythis.props.storeValue
this.props.setStoreValue
import { connect } from ‘react-redux’
import { mapStateToProps, mapDispatchToProps } from ‘../../store’
function Page () {
/** .. **/
}
export default connect(
mapStateToProps,
mapDispatchToProps
)(Page)
```
———————– END ———————–
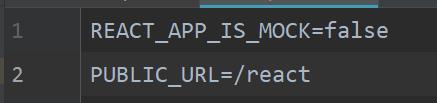
定义环境变量
- 创建环境变量文件

- 自定义的环境变量要以 “REACT_APP_” 作为开头